virtual Machine setting -> options -> shared folders 에 always enabled 체크 후 add눌러서 공유할파일위치 선정

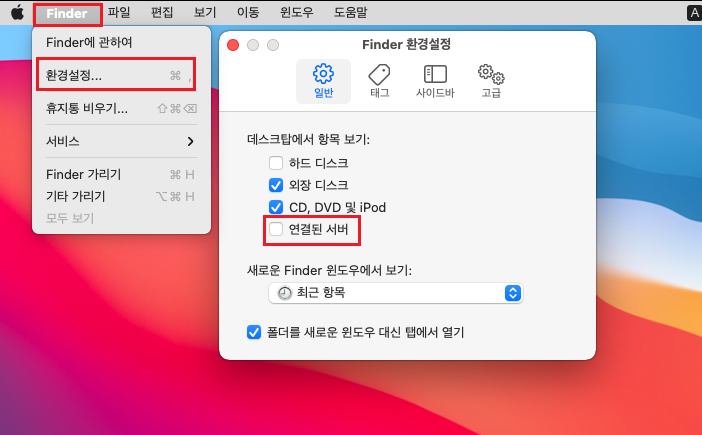
finder의 환경설정 클릭 후 연결된 서버 누르면 vmware shared folders가 생기면 거기서 빼쓰면된다
반응형
virtual Machine setting -> options -> shared folders 에 always enabled 체크 후 add눌러서 공유할파일위치 선정
finder의 환경설정 클릭 후 연결된 서버 누르면 vmware shared folders가 생기면 거기서 빼쓰면된다
mac에서 ios 에뮬레이터로 앱 구동시
Warning: CocoaPods not installed. Skipping pod install. 에러가 뜬다면
터미널에 sudo gem install cocoapods 실행
cocoapods를 설치하자
ios구동시 (12 pro max 에뮬)
Automatically assigning platform `iOS` with version `9.0` on target `Runner` because no platform was specified. Please specify a platform for this target in your Podfile
에러가 났을때
ios -> Podfile 파일을 열고
platform : ios, '10.0' 주석풀고 10으로 변경
| The method 'FallThroughError' isn't defined for the class (0) | 2023.06.26 |
|---|---|
| Flutter/Flutter.h error (0) | 2021.12.16 |
| Warning: CocoaPods not installed. Skipping pod install. (0) | 2021.07.26 |
| web 빌드시 Missing index.html 에러 날때 (0) | 2021.07.15 |
| flutter Unable to find git in your PATH (0) | 2021.07.03 |
앱추가 선택->android선택

패키지이름과 디버그 서명인증서 sha-1 입력하자

앱 패키지는 플러터 프로젝트 ->android ->app ->build.gradle 에 defaultConfig 안의 applicationId 이다

sha-1은 android -> build.gradle 오른쪽 클릭 후 Open in Terminal 클릭

아래 터미널에 gradlew signingReport 입력 후 엔터 치고 debug release 등 많은데 선택해서 sha1 복사 후 홈페이지에 입력
안되면 ./gradlew signingReport

json파일 다운받은 후

android -> app 디렉토리안에 넣는다

그리고 android ->build.gradle의 dependencies 안에
classpath 'com.google.gms:google-services:4.3.8' 입력

다시 android ->app -> build.gradle에 가서
apply 근처에 apply plugin: 'com.google.gms.google-services' 입력
dependencies 안에 아래 두개 입력
implementation platform('com.google.firebase:firebase-bom:28.3.0')
implementation 'com.google.firebase:firebase-analytics'

끝
======================================================================
Firebase CLI를 이용하면 이런거 다필요없다 알아서됨
| android release 배포하기 (0) | 2021.10.13 |
|---|
ios는 mac os에서 해야함
firebase 프로젝트를 생성하고 ios 클릭

ios번들 id 찾으러

flutter 프로젝트의 ios폴더 오른쪽 클릭 -> flutter -> open ios module in xocde 클릭

xcode상에서 Runner클릭 ->General에 Bundle Identifier가 번들id이다 원하는이름으로 수정 후

입력하고 앱등록 클릭

GoogleService-Info.plist을 원하는 위치에 다운받는다
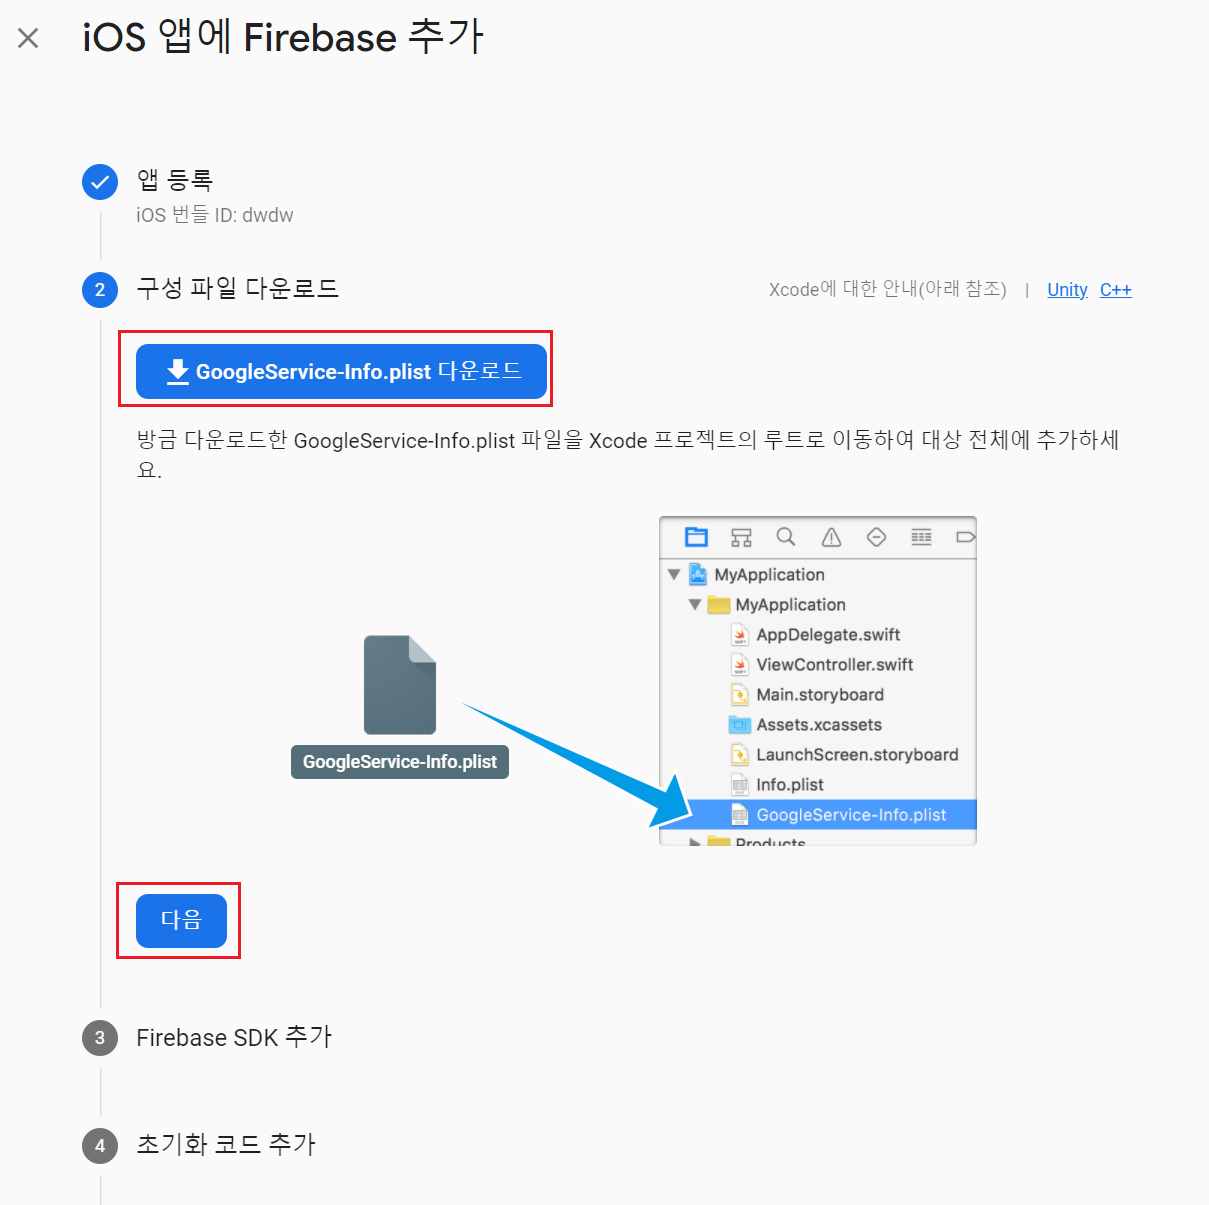
아까 열은 xcode의 Runner에 오른쪽클릭 -> Add Files to Runner 클릭

저장한위치의 plist파일 선택

콘솔에서 이제 다음 을 눌러 한번에 마지막 단계로가서 콘솔이동나오면 끝

======================================================================
Firebase CLI를 이용하면 이런거 다필요없다 알아서됨
| ios udid 확인방법 (0) | 2021.10.05 |
|---|---|
| ios 빌드시 observatory not discovered after 30 second. this is taking much longer than expected.. (0) | 2021.10.01 |
| Error: CocoaPods's specs repository is too out-of-date to satisfy dependencies. (0) | 2021.09.16 |
| ios facebook login error InvalidOperationException (0) | 2021.08.16 |
| ios에서 google login 안될때 our app is missing support for the following URL schemes (1) | 2021.08.15 |
android
android/app/src/main/AndroidManifest.xml
laber

ios
ios/Runner/Info.plist
CFBundleName

| firebase dynamiclink 만들기 (0) | 2023.03.03 |
|---|---|
| google map 연동 (0) | 2022.09.25 |
| money comma (0) | 2021.11.05 |
| flutter 현지화 (0) | 2021.07.28 |
| TextField 사용시 바깥부분 터치시 focus 잃게하는방법 (0) | 2021.07.28 |
github에 이미 파일이있는데 처음에 pull 안하고 열심히 커밋하다 push 했을때
fatal: refusing to merge unrelated histories 에러가 뜬다면
git pull origin master --allow-unrelated-histories
하면 저장소와 내 커밋 병합해줌
끝
| ignore 설정 (0) | 2022.09.08 |
|---|---|
| use select value (0) | 2022.02.24 |
flutter 사이트 접속 get started -> macOS 클릭
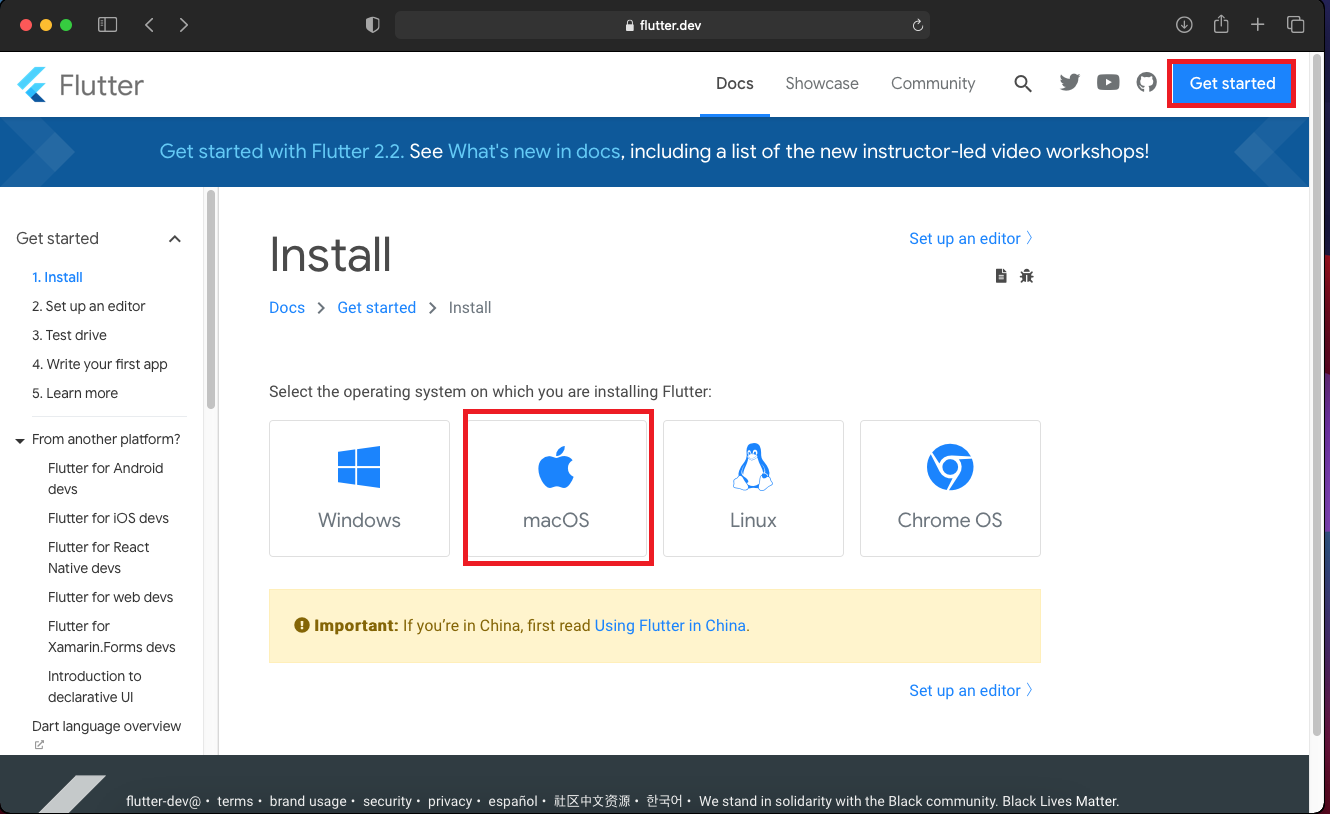
다운로드 후 원하는위치에 옮겨놓는다

터미널 열고 nano ~/.bash_profile 입력(절대경로로 지정할것임) (권한오류가 날때 앞에nano앞에 sudo 붙이자 )

홈피에 export PATH="$PATH:`pwd`/flutter/bin" 이렇게나와있는데 $PATH:이 뒷부분 다지우고 flutter 경로 /bin"을 입력
drag and drop하면 경로가 들어감
입력 후 control+x 다음 y 다음 엔터 까지하면 끝 터미널 재실행

flutter --version 입력하여 설치된것 확인

| 앱 이름 국제화 (0) | 2024.01.28 |
|---|---|
| fireabase 연동 (2) | 2022.09.22 |
| firebase export PATH="$PATH":"$HOME/.pub-cache/bin (0) | 2022.09.22 |
firebase 웹 배포 시 전에 프로젝트를 삭제했을 경우
firebaserc already has a default project라는 에러가뜬다
이럴땐 프로젝트 콘솔에서
firebase use --add 을 실행하면 프로젝트를 다시 선택할수있다
| 컴퓨터상에서 배포하기 (0) | 2023.05.17 |
|---|---|
| web icon 변경하기 (0) | 2022.03.07 |
| flutter 2.0 web firebase hosting이용해 배포하기 (0) | 2021.07.14 |
프로젝트르 처음만들거나 낮은버전에서 만들었을때
Terminal 에서
flutter create .
실행 끝
==============================================================
수동
flutter build web 했을때 missing index.html 에러가 날때
폴더 디렉토리에 web이란 폴더 생성 후
file생성으로 index.html 생성하고

아래 내용을 넣은후 실행하면 끝 (프로젝트생성시 web 선택하면 자동생성되는 html코드 title부분수정해야 링크줄때 제목 제대로 나옴)
<!DOCTYPE html>
<html>
<head>
    <!--
      If you are serving your web app in a path other than the root, change the
      href value below to reflect the base path you are serving from.

      The path provided below has to start and end with a slash "/" in order for
      it to work correctly.

      For more details:
      * https://developer.mozilla.org/en-US/docs/Web/HTML/Element/base
    -->
    <base href="/">

    <meta charset="UTF-8">
    <meta content="IE=Edge" http-equiv="X-UA-Compatible">
    <meta name="description" content="A new Flutter project.">

    <!-- iOS meta tags & icons -->
    <meta name="apple-mobile-web-app-capable" content="yes">
    <meta name="apple-mobile-web-app-status-bar-style" content="black">
    <meta name="apple-mobile-web-app-title" content="get_x_with_youtube">
    <link rel="apple-touch-icon" href="icons/Icon-192.png">

    <title>title</title>
    <link rel="manifest" href="manifest.json">
</head>
<body>
<!-- This script installs service_worker.js to provide PWA functionality to
     application. For more information, see:
     https://developers.google.com/web/fundamentals/primers/service-workers -->
<script>
    var serviceWorkerVersion = null;
    var scriptLoaded = false;
    function loadMainDartJs() {
      if (scriptLoaded) {
        return;
      }
      scriptLoaded = true;
      var scriptTag = document.createElement('script');
      scriptTag.src = 'main.dart.js';
      scriptTag.type = 'application/javascript';
      document.body.append(scriptTag);
    }

    if ('serviceWorker' in navigator) {
      // Service workers are supported. Use them.
      window.addEventListener('load', function () {
        // Wait for registration to finish before dropping the <script> tag.
        // Otherwise, the browser will load the script multiple times,
        // potentially different versions.
        var serviceWorkerUrl = 'flutter_service_worker.js?v=' + serviceWorkerVersion;
        navigator.serviceWorker.register(serviceWorkerUrl)
          .then((reg) => {
            function waitForActivation(serviceWorker) {
              serviceWorker.addEventListener('statechange', () => {
                if (serviceWorker.state == 'activated') {
                  console.log('Installed new service worker.');
                  loadMainDartJs();
                }
              });
            }
            if (!reg.active && (reg.installing || reg.waiting)) {
              // No active web worker and we have installed or are installing
              // one for the first time. Simply wait for it to activate.
              waitForActivation(reg.installing ?? reg.waiting);
            } else if (!reg.active.scriptURL.endsWith(serviceWorkerVersion)) {
              // When the app updates the serviceWorkerVersion changes, so we
              // need to ask the service worker to update.
              console.log('New service worker available.');
              reg.update();
              waitForActivation(reg.installing);
            } else {
              // Existing service worker is still good.
              console.log('Loading app from service worker.');
              loadMainDartJs();
            }
          });

        // If service worker doesn't succeed in a reasonable amount of time,
        // fallback to plaint <script> tag.
        setTimeout(() => {
          if (!scriptLoaded) {
            console.warn(
              'Failed to load app from service worker. Falling back to plain <script> tag.',
            );
            loadMainDartJs();
          }
        }, 4000);
      });
    } else {
      // Service workers not supported. Just drop the <script> tag.
      loadMainDartJs();
    }
  </script>
</body>
</html>